If you have FreeStyler already installed, skip to the Magic 3D Easy View installation section.
FreeStyler Installation
- FreeStyler requires Microsoft Net 3.5 to run. If you do not have Windows 10 or later, download and install it from https://www.microsoft.com/en-ca/download/details.aspx?id=21
- Download and install FreeStyler from http://users.telenet.be/freestylerdmx/
- IMPORTANT: By default, FreeStyler installs into the C: drive's root directory “C:\FreeStyler”. A better directory to install into is “C:\Program Files (x86)\FreeStyler” folder. This is the “proper” installation folder for Windows programs. The term directory (DOS command prompt term) and folder (Windows desktop term) indicate the same thing.
- A Windows Firewall window will pop up during the initial install. You want to give permission for Freestyler to access the network. I allowed all 3 options which may not be necessary.
- During the install, check the checkbox to download and install Magic 3D Easy View. It is really just a “download” option. It will install Magic 3D before installing the rest of Freestyler.
If you missed selecting the checkbox, all is not lost! Go to Nicolaudie and download the latest version.
- Complete the installation of FreeStyler
Magic 3d Easy View Installation
If you did not check the checkbox to install Magic 3D.
- IMPORTANT: Install Magic 3D Easy View into the SAME folder as where FreeStyler was installed in. The default location for FreeStyler is “C:\FreeStyler”. If you followed this guide for installing both FreeStyler and Magic 3D Easy View then use “C:\Program Files (x86)\FreeStyler”. If not, use the directory where you installed FreeStyler,most likely the default location “C:\FreeStyler”.
- A Windows Firewall window will pop up during the initial install, I allowed all 3 options which may not be necessary.
- Complete the installation
- During Magic 3D Easy View installation, it will also install the SIUDI Drivers into the C:\SiudiDriver root directory. These are used if you have a Sunlite USB to DMX controller.
Testing
You will open Magic 3D Easy View from within FreeStyler. This allows FreeStyler to control Magic 3D Easy View. Normally, you will not run Magic 3D Easy View on its own.
- Open FreeStyler
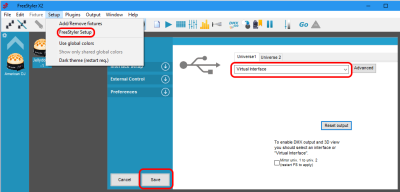
- Select the Virtual Interface. If it doesn't automatically open to selecting the interface, go to FreeStyler Setup and select Interface Setup.
- You should also see the 3D icon enabled in FreeStyler menubar. This indicates that you've installed Magic 3D Easy View into the same directory as FreeStyler. If the icon is greyed out, then reinstall Magic 3D Easy View into the FreeStyler directory.
- After clicking on the 3D icon, the Universe Patch dialogue window will open. There should be the option for the FreeStyler DMX Universe shown. If not, then go back and check your installation of Magic 3D Easy View.
- Once the Magic 3D Easy View window opens, you should see:
Important Checks:
- DMX Level and Universes Patch icons are present
- Indicates that it is “Controlled by FreeStyler”
- Indicates that it is in “Eco Mode” and not “Demo Mode”. Demo Mode is used when no virtual or hardware DMX interfaces are found.
- Indicates that “DMX ON” with a Green LED.
If you've gotten this far, then it is working and good to go.
Problem/Glitch:
When I first turn on my computer and run FreeStyler then hit the Magic 3D Easy View button, sometimes nothing happens. Exiting FreeStyler and running it again fixes the problem and then Magic 3D Easy View works.


