This is an old revision of the document!
Fixture Creator Tutorial - Par Cans, Dimmer Packs, Switch Packs
This tutorial for the FreeStyler Fixture Creator is possibly the easiest to master of all.
This tutorial is going to use the “Par Can, dimmer,…” option, when you first start the Fixture Creator, but I will be going into other options of the Fixture Creator because of the limitations of this option.
I will go through setting up various types of fixtures using this option such as a Par Can, a Dimmer Pack and a Switch Pack.
Par Can
Start Fixture Creator and you should see the following.
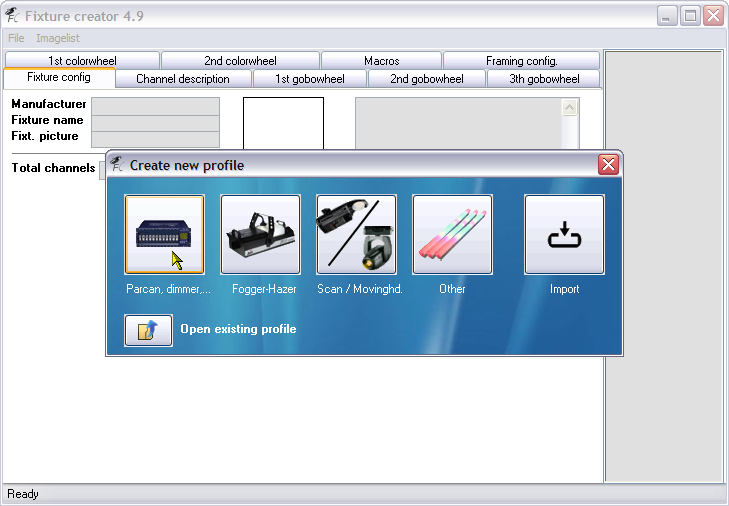
Click the “Parcan, dimmer,…” button on the Create new profile dialogue.
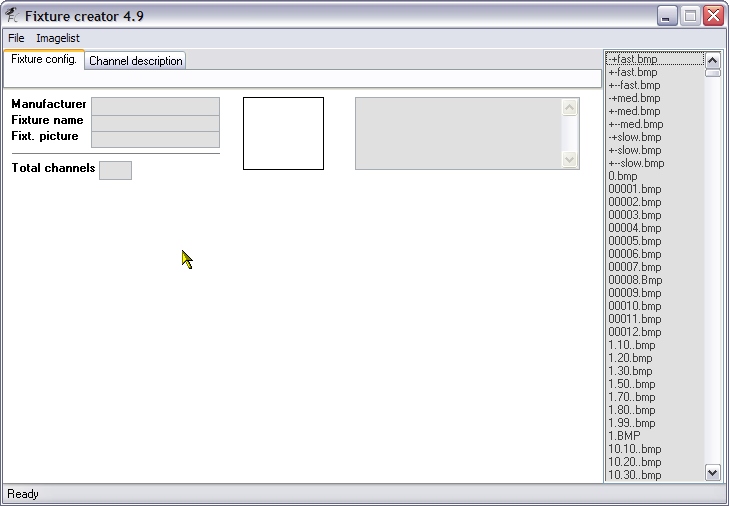
Now you are on the “Fixture config.” tab, and you can see it only has a few fields that you can fill in, because lets be honest what can you do with a Par Can ? Answers on a post card to …, no seriously a Par Can only has the ability to be dimmed (intensity), I do not want anyone extremely technical (super geeky) to say “Well actually you can do this with Par Cans…”.
I will now explain the fields that are available on this screen.
- Manufacturer - This field hold the manufacturer of the fixture you are creating, please use the manufacturers full name for example American DJ rather than ADJ. The reason for this is because FreeStyler and Fixture Creator, create an internal list of the Manufacturers as folders to help you locate fixture files easier. If you are modifying fixtures or want to store all the fixtures you use in one place, then you could create a “custom” manufacturer, for example I might use a manufacturer name of “AndreCustom”.
- Fixture name - Use the manufacturers full name of the fixture, include what mode and/or the number of channels if possible, only if it is relevant. As we are creating a Par Can that would not be necessary. Again if you are modifying fixtures from the standard or testing things out then possibly add to test or something to the end of the name, to distinquish it from the standard fixture.
- Fixt. picture - This field hold the name of a picture of the fixture that will be displayed to the right of these fields. I do not actually type the filename in this field, I use the list of fixture pictures displayed to the far right. These picture files are stored in the FreeStyler/Fixtures folder and are in gif format. The size of the picture should be around 60×60 but you can use other sizes but this size will not cause the picture to cover up the comments box if the width is higher. You need to use a picture as this is what you will click on in FreeStyler to select what fixture you want to control.
- Total channels - This field hold the total number of channels your fixture has. The maximum number of channels that FreeStyler and the Fixture Creator support is 33. To use fixtures that have more than this number of channels in FreeStyler and the Fixture Creator takes a bit of creative thought but is not for this tutorial.
- Fixture Picture - The square box to the right of the Manufacturer, Fixture name and Fixt. picture fields is the area wher the fixture picture will be displayed.
- Comment Box - Use this text box to add any relevant comments, I normally put the full manufacturer, fixture name, mode, no. of channels, my name, if the fixture has been tested or not. Put anything in here that will help people when they look at the fixture profile in Fixture Creator and when they are possibly going to select it in FreeSyler>Setup>Add/Remove fixtures.